
This article details an example of a procedure written to ISA-S88 standards in DeltaV. The simplified recipe used in this example is for aspirin tablets. It contains all of the elements outlined in a previous blog here. The contents have been broken up in a way which are easy to follow, even if you are not overly familiar with DeltaV.

This blog has been created alongside a video which summarises the setup and development. The video is linked below on Youtube:
https://www.youtube.com/watch?v=e2aL2jJLBfY&t=11s
Objective:
Write a procedure according to S88 standard to implement the following recipe for aspirin pills.
- Add water, corn starch and acetylsalicylic acid while mixing.
- Continue mixing for 10 more seconds.
- Transfer the mixture to the dryer.
- Heat the mixture till 90°c while mixing
- Switch off the heater and wait till the temperature drops till 20°c.
- Switch off the mixer.
- Transfer the mixture to outlet tray.
Heating process should be simulated and controlled by PID.
Procedure:
Create the following control modules. Set the PID mode to Auto. Change the set point to 60. Gain to 0.45. Enable simulate parameters in A1.
Control Modules:
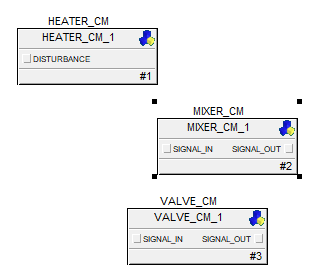
Heater_CM
Heater_CM is a PID controller for altering and regulating temperature. As highlighted in a previous blog detailing its operation, found here , its main features are a PID block and a custom heater process block linked by a feed back loop. In the PID block "PID1" set the set point to 50 and change the mode to 'Auto'. The 50 will provide the default temperature the controller will settle on and Auto refers to how the PID tracks the IO. This set point value will be changed to heat the mixture to 90°c and to cool the mixture to 20°c.
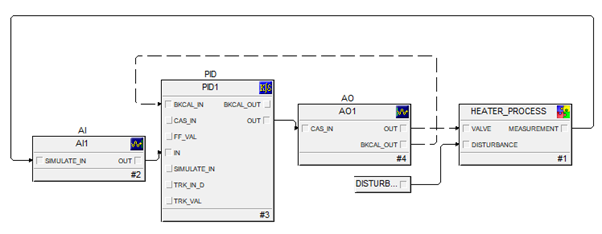
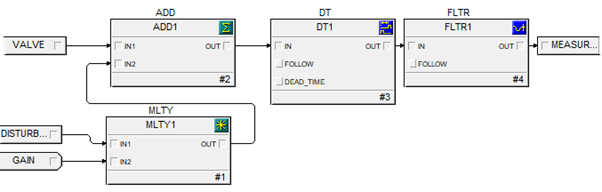
Heater process contains a deadtime block and a low pass filter and outputs an internal parameter called 'Measurement'. The filter will cause a phase shift in comparison to the PID output. This feature will prove an easy way to determine whether or not the heating process has settled on set point and there is little to no overshoot occurring. The inputs to Gain and Disturbance will be 0 in this simulation but here is where you would alter these inputs if you were modelling your own controller.
Mixer_CM
Mixer CM has a Boolean input and Boolean output. So the agitator will be either ON or OFF at any given time in the procedure. This control module will feature in two separate units which will operate for different amounts of time defined by the upcoming phases.
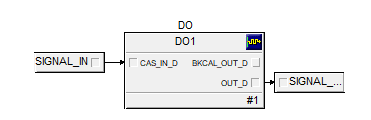
Valve_CM
Valve CM has an Boolean input and output so will also either be ON or OFF at any given time. These are grouped together in different equipment modules to provide the logic for adding ingredients and transferring them to and from the separate units.

Equipment Module:
Create the following equipment modules with the created control modules.
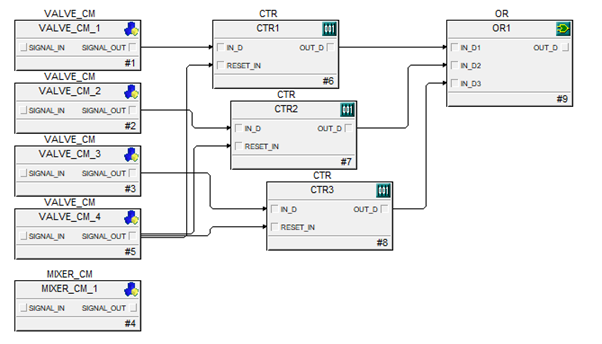
MixterTank_EM
MixerTank_EM contains 4 valves. Valve1,2 and 3 are inputs and valve 4 empties/transfers the contents out. OR1 block Out_D which we will function as the container. Mixer isn’t linked to anything. Sometimes, like this, control modules may operate in parallel within the same equipment module.
HeaterMixer_EM
HeaterMixer_EM is made up of a heater_cm, a mixer_cm, and a valve_cm. The heater will perform the heating and cooling logic, the mixer will mix, and the valve contains the logic for emptying the tank operating as transfer out valve.
Unit Class:
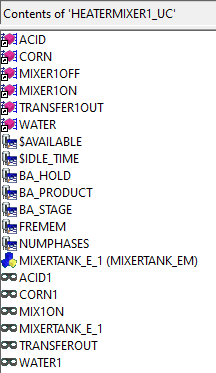
Create 2 unit classes: Mixertank_uc and heatermixer_uc. Place an instance of mixertank_em into mixertank_uc and place an instance of heatermixer_em into heatermixer_uc. At this stage you then create aliases to equipment for your operations which your phases may reference. You do so by right clicking on the unit classes and selecting new alias.
Aliases:
MixterTank_uc Aliases
MixerHeater Aliases
Phases:
Phases in MixerTank UC:
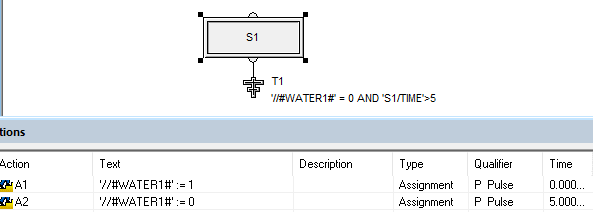
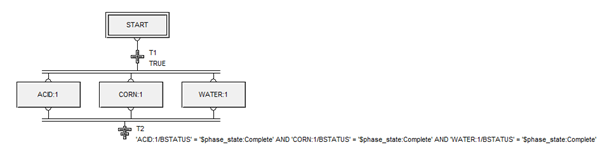
Water phase, this phase references the alias water1, turns on 5 seconds then turns off. it will be connected to valve1.
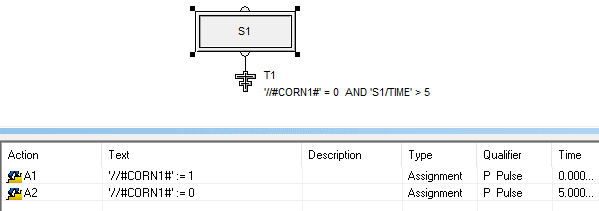
Corn phase, this phase references the alias Corn1, turns on 5 seconds then turns off. it will be connected to valve2. Here corn starch is added.
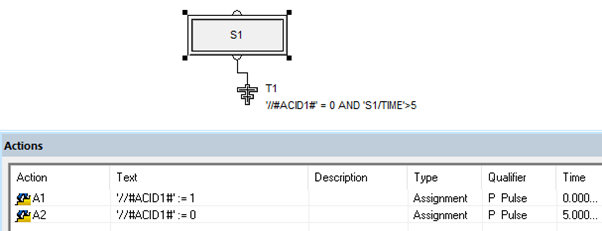
Acid phase, this phase references the alias ACID1, turns on 5 seconds then turns off. it will be connected to valve3. Here acetylsalicylic acid is added.
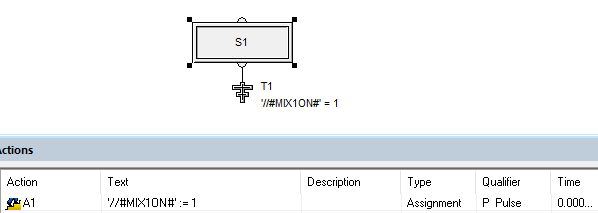
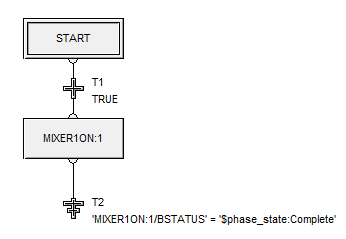
Mixer1ON phase turns the mixer on. Notice it doesn't turn off. This is because the recipes calls for the mixer to on in parallel to the 3 ingredients being added and to remain on for 10 seconds afterwards.
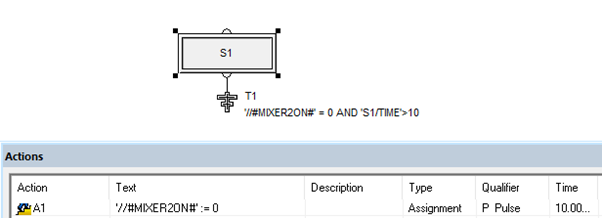
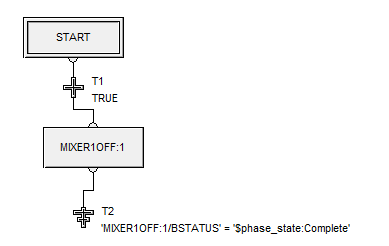
Mixer1ON truns the mixer off after 10 seconds.
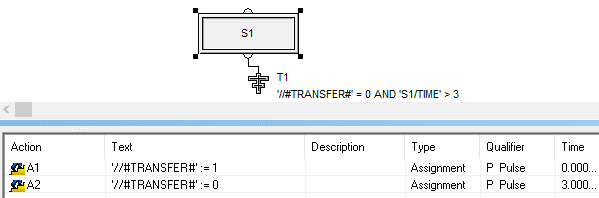
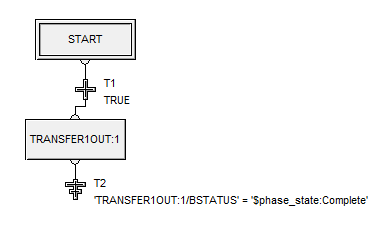
Transfer1OUT transfers out the liquid for 3 seconds then closes.
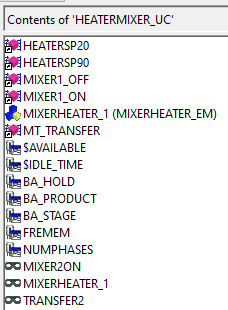
Phases in MixerHeater_UC:
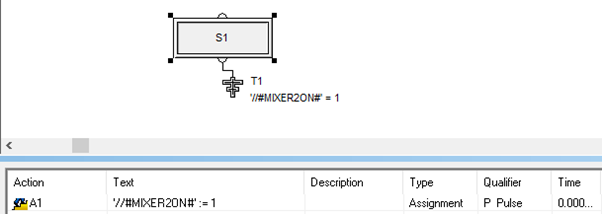
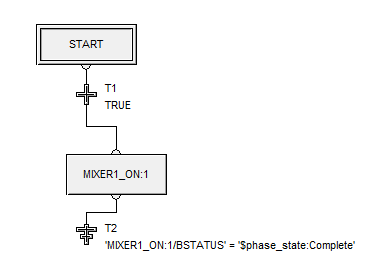
Mixer1_ON, this phase references the second mixer. Notice it doesn't mixer remains on until another phase is called.
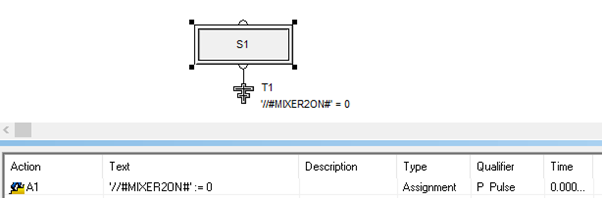
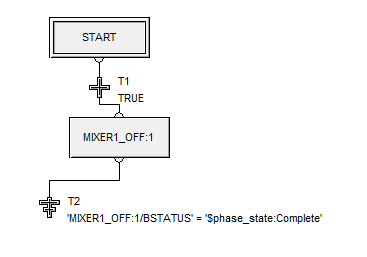
Mixer1_OFF, this phase references the second mixer. Its a phase for turning off the mixer.
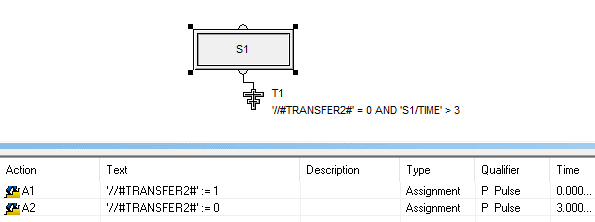
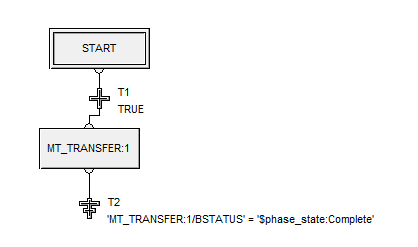
MT_TRANSFER transfers out the liquid for 3 seconds then stops.
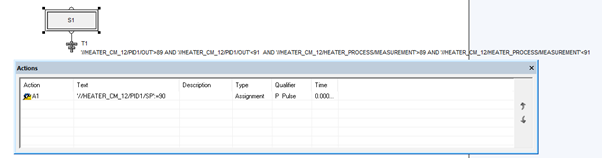
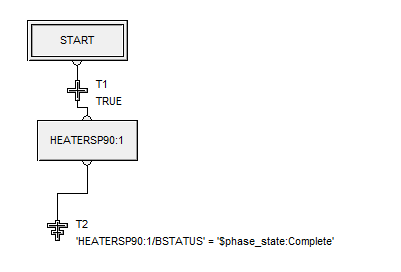
HEATERSP90 phase references the set point directly in the equipment rather than in an alias like in previous phases. It tells the heater to rise the temperature to 90°c.
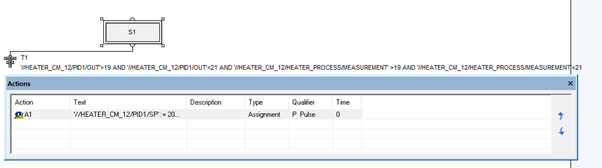
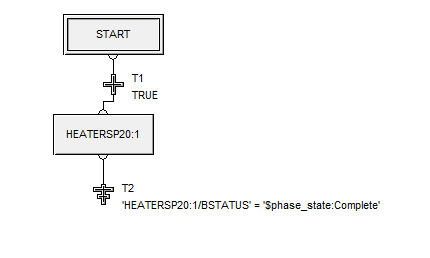
HEATERSP20 phase references the set point directly in the equipment rather than in an alias like in previous phases. It tells the heater to cool the temperature to 20°c.
Process Cell Class:
Create Process cell class and name it.
Create Area:
Create an area and drag your process cell class to it. Drag both unit classes to the area. Enable all the phases. Link the aliases with the equipment. Download. These instructions are performed in more detail in a previous post here.
Operations:
Unit Procedure 1
These operations provide the sequencing logic for the program, often they follow phases in a 1:1 modular way but in the case of parallel operation with other steps they may be grouped together.
9TankEmpty
Transfer out operation.
9Tank1fill
Adds water, corn starch and acetylsalicylic acid.
9Tank1mix
Turns the 1st mixer on.
9Tank1MixOff
This operation turns the mixer off.
EF_UP1
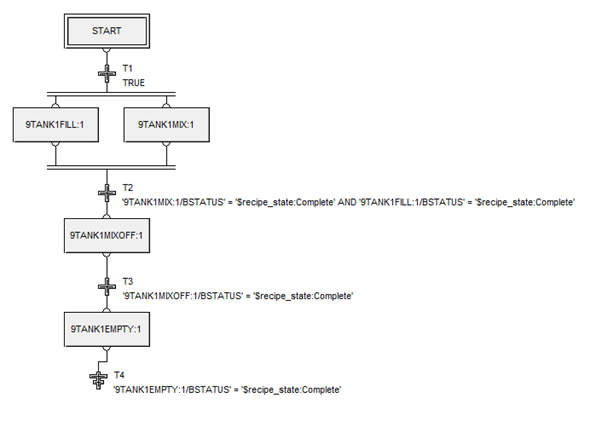
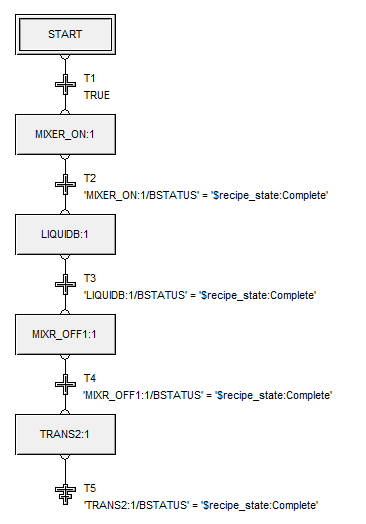
The above operations are added to a unit procedure for the first unit, mixertank_uc called EF_UP1. Here the sequencing of the unit mixertank_uc is formed.
Unit Procedure 2
9Tank2Fill
Cool down operation sets the setpoint to 20°c.
8Tank2Empty
TransferOut operation sequences the transfer out function.
9Tank2CoolDown
Heatup operation sequences the heating up phase.
9Tank2Mix2
Mixer1_ON is the mixer for the second unit. It is named so similar because they originate from the same original control module. This operation sequences the mixers operation.
9Tank2MixOff
Mixer2off operation sequences the turning off of the mixer.
EF_UP2
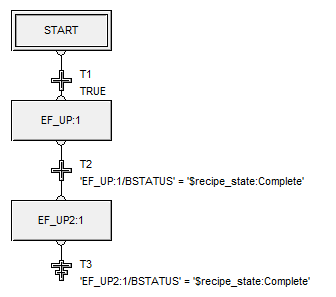
The second unit procedure EF_UP2 sequencing is arranged as following.
Open the procedure main and connect your 2 unit procedures sequentially as follows.
Add both units to a Procedure. Assign the area to batch executive and alarms and events. Assign the procedure to the batch executive. Download.
Batch Application Manager:
Open the batch application manager, start it, verify phases.
Batch operator interface:
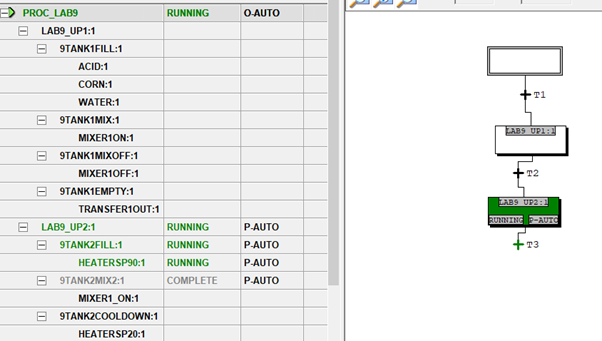
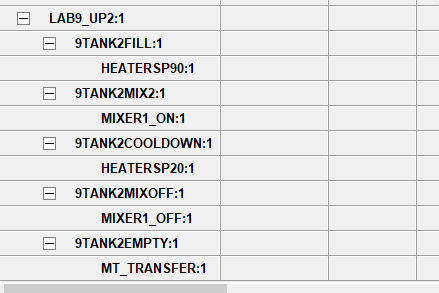
Open the batch operator interface. Add your batch, run it and view. Here you will your procedure broken up into the correct structure. The procedure contains 2 unit procedures (one for each unit). These unit procedures contain operations, and the operations contain the phases. Notice 9TANK1FILL contains multiple phases for each of the ingredients being added. It operates in a sequential manner relying on the termination blocks in each operation to enable the sequencing of the procedure.
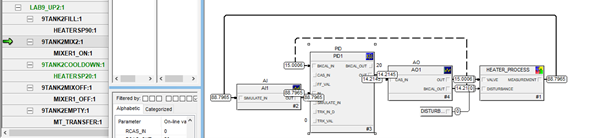
Open the FBD for the heater control module in online mode and monitor the heating up of the liquid to 90c.
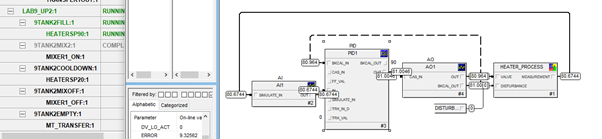
The same can be done for the cooling down of the program in the future cool down operation.
This contains the operations in the second unit procedure.
A live demonstration of this recipe can be viewed here: https://www.youtube.com/watch?v=e2aL2jJLBfY&t=11s
Thank you for reading through this article, and if you have any further questions please feel free to reach out to me at:
contact@appliedprojectsengineering.com